7 AI Photo Edits You Can Describe in Plain English Instead of Rebuilding the Image
A lot of photo editing advice still starts with tools: create a mask, duplicate a layer, select the subject, feather the edge, adjust curves, clean the selection, and repeat. Those techniques are useful, but they are not always the shortest path when the change you want is easy to explain in one sentence.
If you can look at a photo and say, “Remove those people in the background, but keep the person in front exactly the same,” you already have the beginning of an AI editing instruction.
The important part is learning how to turn an everyday request into a bounded edit. A good instruction says what should change, what must stay unchanged, and what you will inspect after the result is generated. That makes AI photo editing much more predictable than simply asking for a “better” image.
Below are seven practical workflows I use as a checklist. They work well as small, testable edits in a browser-based editor such as ClipLumi, but the same thinking applies to other capable AI image editors too.
One thing I would not do is collect hundreds of prompts and treat them like magic recipes. Large prompt libraries are useful for inspiration, but a copied prompt cannot tell you why your particular result failed. The more useful skill is learning how to diagnose an almost-correct edit and make the next prompt narrower than the first.
Mask the footprint, not just the object
For object removal, the editable area should usually include the object plus the evidence it leaves behind: a small edge margin, cast shadow, reflection, or contact point. A mask that hugs the object too tightly can leave a halo or fragment; a mask that is much too wide gives the model permission to rebuild useful surroundings.
Use the smallest region that contains the full visual footprint. If a person casts a shadow across pavement, include the shadow. If a product reflects in a glossy table, include the reflection only when it should disappear too. Then inspect the boundary just outside the edited region before accepting the result.That is the difference between a prompt list and an editing workflow.
1. Replace a distracting background without changing the subject
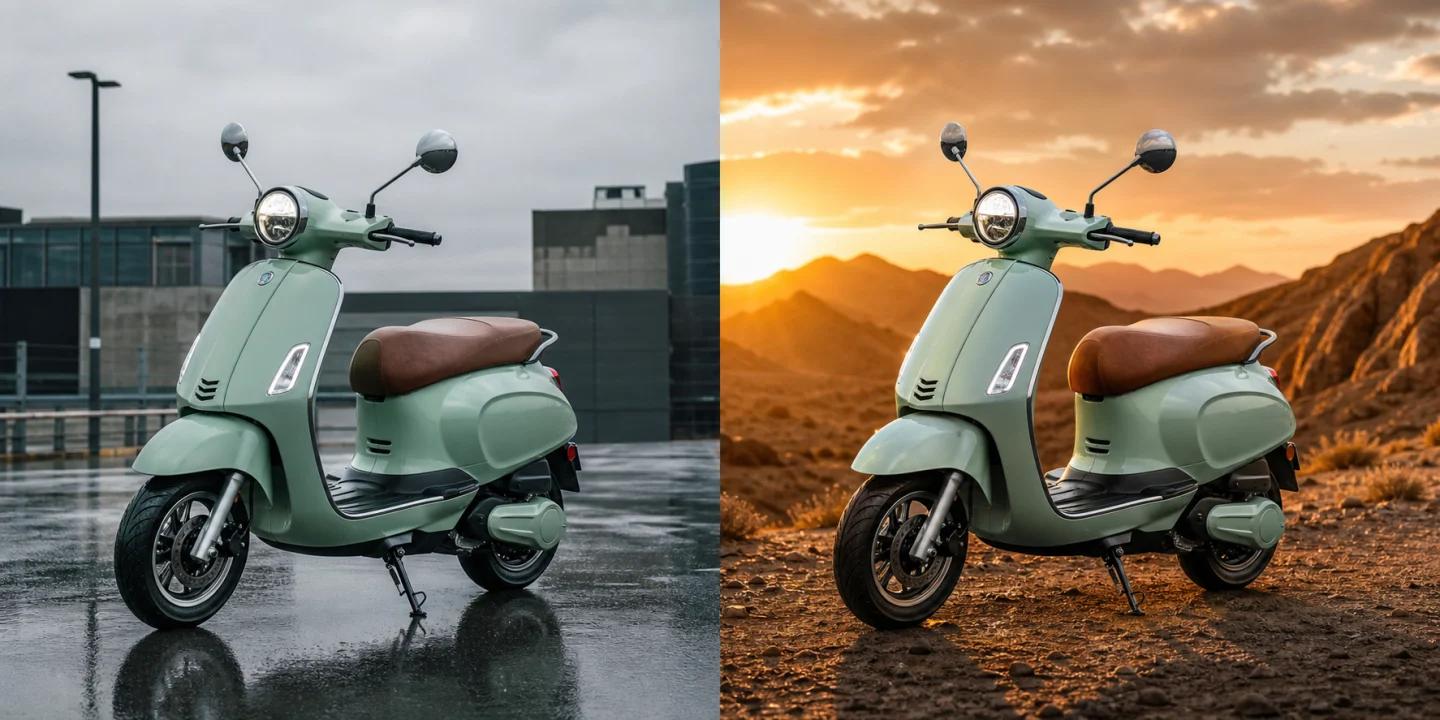
Background replacement is one of the clearest examples of a bounded edit because the subject is often already correct.
A weak instruction would be:
Make this look professional.
That gives the model permission to reinterpret almost everything.
A stronger instruction is:
Replace the background with a simple warm-gray studio wall. Keep the person, pose, facial features, clothing, camera angle, and original crop unchanged.
The second sentence is the quality-control boundary. After the edit, inspect the hairline, shoulders, fingers, transparent or reflective objects, and the direction of the original shadows. Those are common places where an otherwise convincing background edit can reveal itself.
For product photos, also check labels, logos, product proportions, and contact shadows. A new environment is useful only if the product remains trustworthy.
2. Remove people or objects from the background
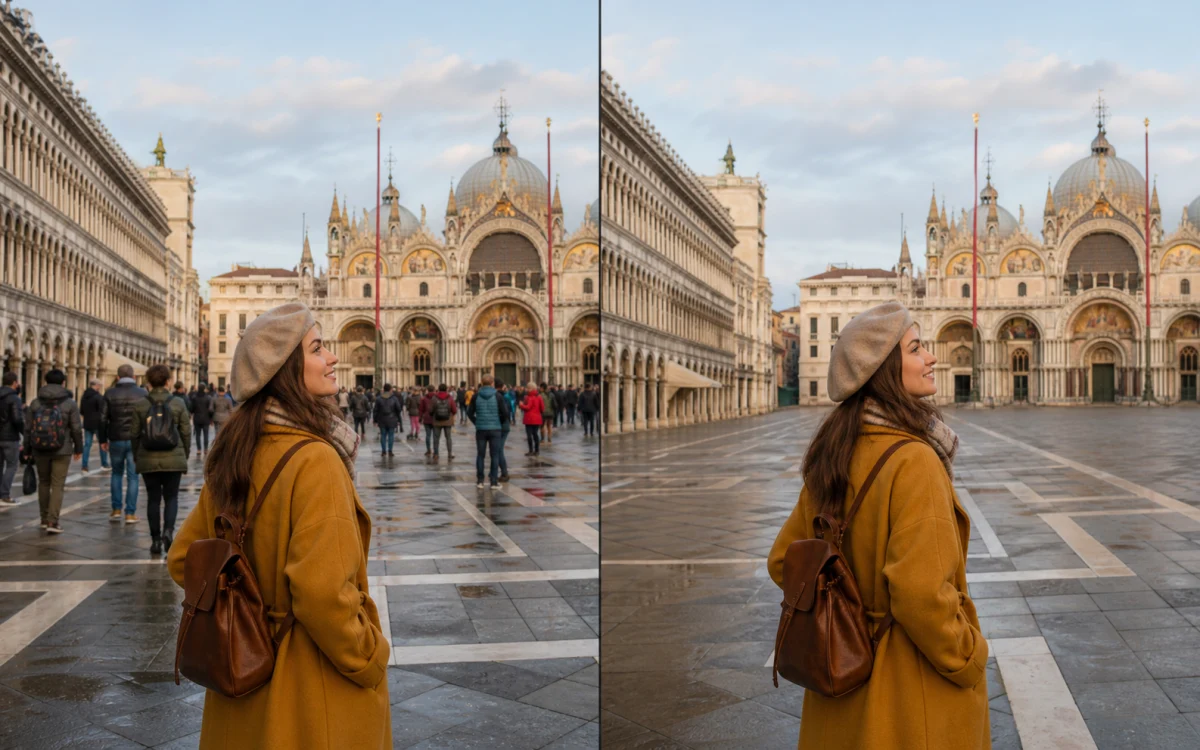
Travel photos, event photos, and street portraits often have one simple problem: the main moment is good, but the background contains distractions.
This is usually a poor reason to regenerate or reconstruct the whole image. The real request is local:
Remove the two people behind the main subject. Reconstruct the wall and pavement naturally. Do not change the main subject, lighting, crop, or foreground objects.
Afterward, zoom into the repaired area. Look for repeated textures, broken lines, duplicated limbs, warped signs, or shadows that no longer make sense.
The useful rule is to review the neighborhood around the removed object, not just the empty space itself. The edit is successful when that local region looks ordinary enough that your eye no longer stops there.
3. Turn an ordinary product shot into a cleaner product image
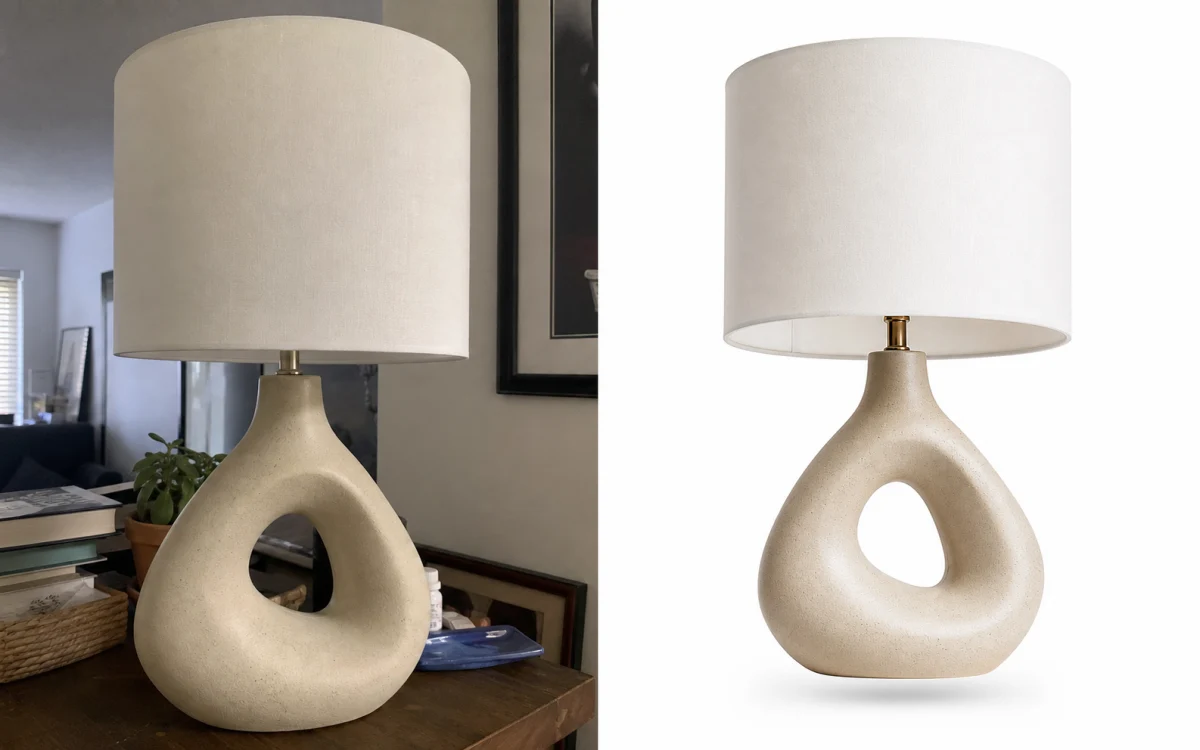
You may already have a usable product photo taken on a desk, counter, or temporary backdrop. The product itself does not need to be reinvented; the presentation needs refinement.
Try an instruction such as:
Keep the product shape, printed label, logo, cap, perspective, and scale unchanged. Replace the current surface and background with a clean neutral ecommerce setup. Preserve realistic contact shadows.
This is especially important for branded objects. If the label text changes, the logo distorts, or the shape becomes subtly different, the result may look polished while becoming less accurate.
A practical review checklist is:
- Does the silhouette match the original?
- Is every important label or logo still correct?
- Is the perspective unchanged?
- Does the product still touch the surface naturally?
- Is the background cleaner without overpowering the object?
AI editing is most useful here when it improves context while leaving product identity alone.
4. Make a portrait look more professional without changing identity

A casual portrait can sometimes become a useful profile photo with a few presentation changes: a quieter background, more appropriate clothing, or cleaner lighting.
The risky part is identity drift. “Make this person more professional” is too broad because the model may treat the face itself as something to redesign.
Instead, separate identity from presentation:
Preserve the person’s face, age, hairstyle, skin tone, expression, and head position. Change the background to a simple office-style neutral background and replace the casual top with a dark business-casual jacket.
Then compare the result side by side with the original. Pay special attention to eye shape, jawline, nose, hairline, ears, teeth, and small asymmetries. Those details make a person recognizable.
If identity matters, use smaller edits. Change the background first, review it, and then change clothing in a second pass rather than asking for everything at once.
5. Restore an old photo as repair, not reinvention
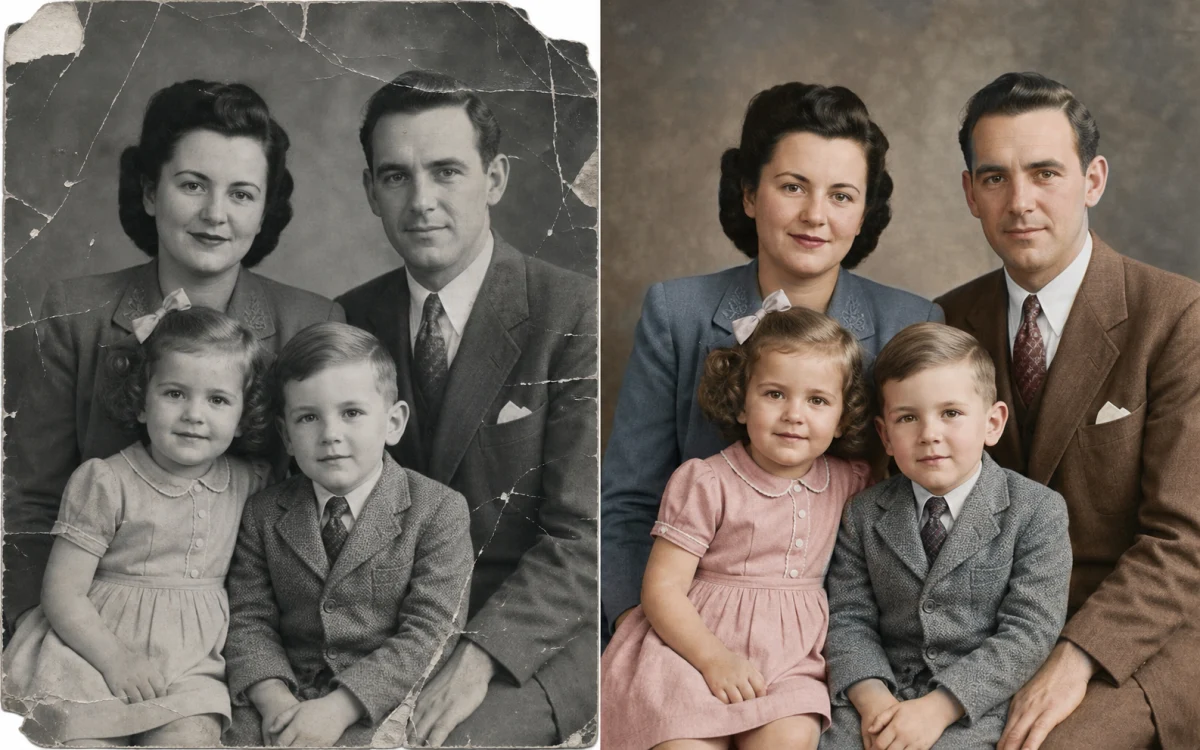
Old photographs require a different mindset. Scratches, fading, stains, folds, and missing regions invite correction, but the historic image itself is the source of truth.
A restoration instruction can be explicit:
Repair scratches, dust, small tears, and faded local areas. Improve clarity gently. Preserve the original faces, clothing, pose, framing, background details, and period character. Do not modernize the scene.
The last sentence matters. Restoration can easily become beautification, and beautification can quietly replace real details with plausible inventions.
Review restored faces at high zoom. Compare facial proportions, hair, hands, jewelry, clothing edges, and the relationship between people in the frame. The objective is not to make the image look newly photographed. It is to make the original easier to see.
6. Fix one weak area in an AI-generated image
AI-generated images often fail in an uneven way. Eighty percent of the composition may be excellent while one supporting object, background region, hand, sign, or texture is distracting.
Instead of rewriting the entire generation prompt, describe the defect as a local edit:
Keep the vehicle, framing, colors, camera angle, and lighting exactly as they are. Simplify the cluttered area behind the vehicle and replace it with a clean street background that matches the existing perspective and light.
This workflow is useful because generation and editing solve different problems. Generation explores possibilities. Editing converges on a chosen direction.
Once you have a version worth keeping, repeated full regeneration can create more problems than it solves. A targeted edit lets you preserve the successful choices already present in the image.
7. Use a reference image to communicate a visual target
Words are not always efficient. “Warm minimal studio,” “soft editorial blue,” or “clean modern office” can mean different things to different people and models.
A reference image can communicate one visual dimension more clearly, but it should have a defined job.
Before attaching a reference, decide whether it is guiding:
- background color;
- material or texture;
- composition;
- clothing style;
- lighting mood;
- or another specific visual property.
Then say so:
Use the reference only for the soft beige wall color and subtle plaster texture. Keep the original subject, composition, pose, clothing, and lighting direction.
ClipLumi supports reference-image workflows in appropriate editing modes, which makes this kind of constrained instruction useful when text alone is ambiguous. A reference should reduce ambiguity, not give the model permission to copy every visual detail.
A prompt pattern that works for most edits
You do not need a huge prompt template. For many practical edits, five short parts are enough:
- Target: identify the subject or region you are changing.
- Action: say exactly what should happen.
- Preserve: list the details that must remain unchanged.
- Reject if: name the failure that would make the result unusable.
- Review: decide what you will inspect before accepting the result.
For example:
Target: the background behind the person. Action: replace it with a softly lit neutral office wall. Preserve: face, hair, clothing, pose, crop, and foreground. Reject if: facial structure or hairline changes. Review: hair edges, shoulders, lighting direction, and identity.
The reject-if line is important because it turns a preference into a stopping rule. “Keep the face similar” is vague. “Reject if the jawline, eye shape, or hairline changes” is much easier to review.
This is more useful than stacking decorative adjectives because each part has a job.
A prompt debugging matrix for the second pass
The first result is often not the hard part. The hard part is deciding what to say when the result is 80% right.
| Failure you see | What probably happened | What to say next |
|---|---|---|
| Face or product changed | Preserve list was too broad or implicit | Name the specific protected features and say the current accepted version must remain fixed |
| Background looks pasted on | New scene conflicts with original light or edges | Fix only light direction, edge spill, and contact shadows |
| Removed object leaves a strange patch | Reconstruction was too unconstrained | Describe what should logically continue through the missing region: wall line, pavement, texture, depth of field |
| Result is stylish but wrong | Style instruction overpowered the task | Re-state the task first, then use one reference or one visual direction only |
| Second pass breaks a correct first pass | The model reinterpreted accepted areas | Start with “Keep the current image unchanged except for…” and reduce the repair radius |
Three examples of a useful second prompt
If the face drifted:
Keep the current background and clothing change. Restore the original facial structure, eye shape, jawline, nose, hairline, and expression from the source image. Do not alter any other region.
If a product shadow looks fake:
Keep the product, background, crop, color, and lighting unchanged. Repair only the contact shadow beneath the product so it touches the surface naturally and follows the existing light direction.
If object removal damaged the wall:
Keep the subject and all existing edits unchanged. Repair only the area where the object was removed by continuing the wall texture and horizontal edge line from the neighboring region. Do not add new objects.
The pattern is the same every time: freeze what is accepted, isolate what failed, repair only that failure.
Choose the operation order before you touch the pixels
Some edits fail because the instruction is wrong. Others fail because the right operations happen in the wrong order. A useful default is repair evidence first, make the creative edit second, and upscale for delivery last.
Use this decision rule:
- Restore first when scratches, compression blocks, heavy noise, or damaged facial areas could be mistaken for real scene detail.
- Edit next when the source is trustworthy enough to judge identity, product shape, edges, lighting, and the change you actually want.
- Upscale last when the content is already correct and the remaining problem is delivery size for print or a larger display.
There are exceptions. If the source is so tiny that you cannot even inspect the area you need to repair, a modest diagnostic upscale can help you see the problem. Treat that as an inspection copy, not as proof that the AI recovered true missing detail. Keep the untouched source as the reference.
A quick preflight is: Is the image damaged? Is the requested change local or creative? Do I only need more output pixels? If the answers are yes in that order, use restore → edit → upscale. This keeps later steps from magnifying damage or spending compute on pixels you may still change.
Do not edit until you know what “done” means
One final habit improves almost every workflow: write two or three acceptance checks before generating the edit.
For a product photo, the checks might be “logo unchanged, shape unchanged, cleaner background.” For a portrait, they might be “identity intact, hair edges clean, background believable.” For restoration, they might be “damage reduced, facial proportions unchanged, original framing preserved.”
That gives you a stopping rule. Without one, it is easy to keep clicking because every result can always be different.
AI photo editing is most useful when it turns a clearly defined correction into a short iteration loop. Start with a photo that already contains something worth preserving, describe one change precisely, and protect the details that are already right.
If you want to test the process, open ClipLumi with an existing photo and choose the smallest useful edit you can describe. Add one reject-if condition before generating. Make the change, compare it against your preservation list, and if something fails, make the second prompt smaller rather than rewriting the entire image.
Disclosure: I work on ClipLumi. The prompt-debugging method above is intended to be useful with any image editor that supports iterative edits.

评论
发表评论